Water is one of the world’s most precious resources.
We need it more than food and shelter.
However, it’s not always easy to get a hold of.
In times of peace, we can easily turn our tap on, and we can pour a big glass of cold water.
If society breaks down, we will almost immediately lose that luxury. A lot of people aren’t truly prepared for that.
Do you have a Lifestraw or Sawyer filter?
A lot of people do, and they think that, that is enough to survive major societal collapses.
The fact is, those are only good for short-term survival.
If something really bad happens, a more permanent solution is necessary.
In terms of cost effectiveness and reliability, a well is the best option for that. It may seem a little outdated, but a well is a lot better than being forced to drink out of a stagnant pond because your Lifestraw got worn out a few months after a major collapse. We have established why a well is important, but I’m guessing that you’re probably scratching your head right now because you don’t know how to go about making one.
Luckily, I’ve put together this guide to help you.
I’ll list all of the materials you’ll need, tell you how to do it, and I’ll give you some tips to make your well stand out among the rest.
What You’ll Need To Dig A Well
It’s best to dig a well before anything actually happens.
It’s a fairly strenuous activity, and you’ll have access to better materials during times of peace.
You definitely don’t want to wait until your tool selection is limited, and you’re starving or dehydrated because you’ve been in a survival situation for months.
So, I’ll list what you need to do this the easy way first.
These materials won’t cost you that much individually, but the overall price of your well will increase dramatically the deeper you dig.
The average price is between $1500 and $12,000.
1: Drive pipe, maul, or sledgehammer

I prefer to use a drive pipe.
You have to ensure that the riser pipes you’re installing are kept straight.
If you use a sledgehammer, you can easily miss your swing.
That will destroy your riser pipe, and you’ll have to replace the entire pipe system.
That’s if you can even get it back out of the ground.
2: Drive cap

A drive cap protects the end of the pipe you’re driving.
I don’t think that I have to tell you how much force you’ll be using when you drive a pipe dozens of feet into the ground.
3: Piping

You’ll need several riser pipes that are about 6 feet in length.
Make sure that you get pipes that are galvanized.
You don’t want the pipes corroding within months of installing them.
Since this is for personal use, it’s best to use 1-1/4 inch pipes.
The technology necessary for bigger wells is expensive, and it’s overkill to have that much water.
4: Couplings
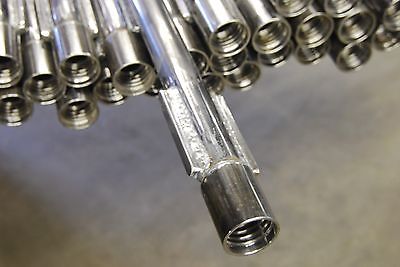
Couplings are just attachment points.
You’ll have to connect several pipes together to reach your desired depth.
These will allow you to do that properly.
I also recommend that you buy some plumbing compound.
That will help to seal the couplings entirely.
5: Well screen
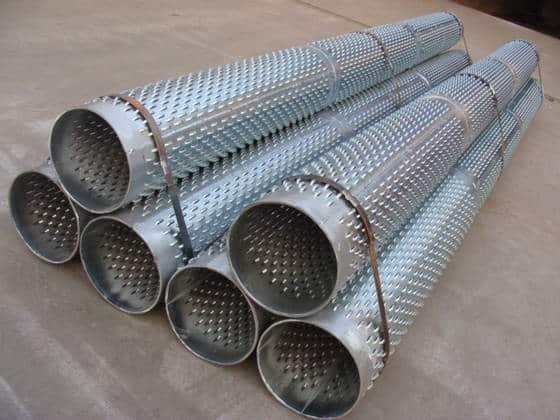
This is the part that gets rammed into the ground first.
You need to buy this from a commercial retailer for the sake of convenience.
They have several hundred slits cut into them, and they require a fibrous mesh to filter out debris in your well water.
Adding those features yourself can be a pain.
6: Pipe wrenches

These are for tightening the couplings on your pipe system.
You don’t need a massive pipe wrench.
You don’t want to exert a lot of force on your couplings.
7: Digging tool

I recommend that you just use a fence post digger.
You can use a hand auger, and a shovel will suffice.
However, you want to keep your hole very neat and uniform.
The fence post digger was designed to quickly dig uniform holes.
8: Pitcher pump

You can buy fancy pumps, but most wells won’t require them, and the whole point of this article is to help you make a well that will be reliable in a survival situation.
There’s no reason to add complicated machinery to the mix.
However, some environments require centrifugal pumps.
A pitcher pump is the type of pump you’ve probably seen in old black and white cowboy movies.
They work, they’re reliable, and they’re a lot cheaper than the fancier pumps available.
You can also make your own pump.
If you’re preparing ahead of time like you should, it’s best to just buy it.
At least you know that it’s going to last when you buy it.
You may not be able to complete a well before you’re forced into a survival situation.
Usually, you won’t want to start digging a well during an emergency. It’s just not practical to do so.
However, long-term catastrophes can lead to you needing a permanent water source, and you’ll need to know what you can do in that situation.
After all, Home Depot won’t be selling supplies anymore, and you’ll have to get a little creative.
This next list will offer some substitutes for the harder to find materials on the first list.
- 1: Piping You’ll have a hard time finding pristine, galvanized pipes during something as horrible as a societal collapse. You may think that you’ll just break into a dilapidated home, and raid its plumbing, but that’s not reality. However, you can use PVC to tap into ground water. It’s obviously not as durable as steel piping, and you won’t want to drive it as deeply, but you can work with it. It’s also much more common than galvanized pipes. You can replace all of the metal piping parts on my first list with their PVC equivalent. The only exception to this is the screen. All the screen does is filter out sand and debris, though. You can use any fibrous material that isn’t poisonous if you try this during a survival situation. It won’t be as proper, but survival isn’t about being proper.
- 2: Digging tool In times of peace, you can easily find digging tools in just about every department store. You should already have one sitting around your house. However, you never know what will happen in a survival situation. If you don’t have a tool, your hands or primitive tools are more than capable of digging the starter hole. You probably won’t get very deep, and you’ll have to drive your piping much more, but you can do it in a pinch.
- 3: Driving tool The driving tool you use can be anything that’s heavy. It doesn’t have to be a specialty tool. Your job will be a lot harder, but any heavy object is enough. You’ll look like a caveman, though.
Selecting a site for your well
Site selection is one of the most important parts of digging a well.
If you dig right next to a septic tank, you’re going to be drinking what is in that septic tank.
If you dig next to gas lines and underground power lines, you’ll probably hurt yourself.
Then, you won’t have to worry about a survival situation in the future.
Make sure that you contact the utility companies in your area before you start ramming pipes into the ground.
When it comes to preventing contamination, you want to dig at least 50 feet away from anything that might contaminate the ground water.
Construct A Well Screen
The well screen is the piece of piping that is at the bottom of your well.
If you choose to just ram regular pipes into the ground, water will only enter from the hole at the very bottom of your pipe system.
A well screen fixes that issue. If you buy one commercially, you can skip this step.
If you want to build your own, you’ll need the tools necessary for cutting into piping.
PVC piping is obviously easier to do this with because you can use your knife.
You can also attach a PVC well screen to the rest of your metal piping.
That will make it easier to build your well screen, but you’ll still have the benefits that come from using steel piping.
You need to cut hundreds of small slits into the pipe that is going to go into the ground first.
If you cut small v-shaped slits into it, you can make a pipe that is resistant to clogging.
The next video by Sun_Chaser shows you how to do this.
After you have your slits cut, you need to add your meshing.
60-gauze meshing will prevent any sand and debris from entering your drinking water.
If you have particularly fine sand in your area, you’ll need to use 100-gauze meshing.
To add this, you just need to wrap it around the slits that you cut, and you can use metal bands to secure it into place.
Of course, using an adhesive around the edges of the meshing will make it more effective.
Bore/Drill The Well
This is one of the simplest steps, but it requires a lot of muscle.
First, you need to dig a starter hole.
If you bought a fence post digger, this step is a lot easier.
You’ll want to dig as deep as you possibly can.
The more you dig, the less you’ll have to drive pipes into the ground. After you do that, you just need to attach the well screen to your first piece of riser pipe, and begin driving it into the hole you dug.
You have to keep the pipe system vertical as you do this.
If you don’t, your well won’t work.
Every time you’ve driven the system far enough that you can’t pound anymore, attach a new piece of piping with the couplings that you have, and keep driving.
You’ll have to do this several times.
Their materials are less advanced, but that just shows that you can do this without spending a lot of money.
Remove Dirty Water
After you’ve driven the pipe system into the ground a bit, you’ll need to check for water.
You can tie a weight to the end of a line, and then you can guide that line into your well.
When you pull it up, it should be wet.
You can use the wet line to see how deep the water at the bottom is, too. Once you’ve reached ground water, you have to flush it out.
The fastest way to do this is to use a hose.
You can slip a hose down your pipe system, turn it on, and let it run until the water that comes out is no longer dirty.
You can also attach your pump, and use it to pump out all of the junk at the bottom, but that takes a lot longer.
If you have access to a hose, I suggest that you use it.
Construct The Hand Pump
It’s best to purchase these from a retailer that specializes in building pumps.
They’re fairly complicated to make from scratch, and they require a lot of precision cutting.
However, you can watch this video by Approtechie to learn how to build one from scratch.
The specific steps to building a hand pump vary depending on which pump you buy or build, but they all tend to have the same basic steps in common.
- First: Install your well cap. You can buy this, or you can make your own by simply drilling a hole in a PVC cap. It’s not complicated. It’s just a cap that keeps anything from falling down your well.
- Second: Whether you build it yourself or buy it, you’ll have to put together a piston. To do it from scratch, you can use a 1-inch PVC pipe and a 1-1/8 inch PVC pipe of the same length. The 1-inch pipe can easily slide into the slightly bigger one. To make it airtight, you’ll need to cut grooves into the 1-inch pipe near the bottom, and then you need to fill those grooves with o-rings. This will create a suction effect when you pump your handle. If you want an easier time pumping, you need to liberally apply petroleum jelly where the pipes rub each other.
- Third: You have to install your handle. There are a lot of designs for this. If you buy your pump, this step is a lot simpler than doing it yourself. As long as your design pulls the piston up and pushes it back down when you work the handle, it will work. Also, don’t forget to leave a spout of some sort at the top. You won’t get very far if the whole pump is sealed.
- Finally: Attach your assembled pump. If your cap is threaded, you can screw the pump right in. Otherwise, you’ll need to fit it in the hole and seal it with plumber’s compound. Commercial units will have their own method of installation. Larger diameter wells will require suction tubing to be ran down into the well for a hand pump to work. However, this tutorial is for a relatively thin well. So, you shouldn’t need any tubing.
Conclusion
A well might seem like something that should have been left in the days of the old west, but it can make long-term survival a lot easier.
Most of the survival gear aimed at gathering water is only good for short-term applications.
A well requires quite a bit of work, but it will provide water for years.
If you use the ground water supplied to it reasonably, it shouldn’t ever dry up. Obviously, this is something that you want to implement into your survival plan very early.
It’s far too complicated to be practical when things have already gone south.
You’ll have a lot of immediate threats to worry about.
However, having a well before anything starts will put you in a way better spot than someone who thought their Lifestraw would take care of their entire family for years. I hope that this guide has helped you, and hopefully it has made you consider drilling a well.
Even if your next survival situation is a simple, long-lasting boil order, a well will come in handy.
If you liked this guide, feel free to tell your friends about it.
You can also voice your opinions in the comments.
As always, thank you for taking the time to hear my thoughts on prepping.
You are currently viewing a placeholder content from X. To access the actual content, click the button below. Please note that doing so will share data with third-party providers.
More Information


Good article. Just need some pics for me to understand what you are saying.
Thank you for your info. It very interesting one of these days I might just do it.
Thank you so much,
I have been preparing for hard time, I have been dehydrated food, and canning.
Now I need to get a water source. I will follow your instructions. Thank you again.